## Fix Home Leaks with Easy DIY Solutions
Water is the lifeblood of any modern home, but unfortunately, when things go wrong, that same water can become a destructive force. A slow drip under the sink, a wet patch on the ceiling, or a constantly running toilet might seem like minor inconveniences, but they are often the early warning signs of significant structural problems. Ignoring these small leaks can lead to skyrocketing utility bills, hazardous mold growth, and severe damage to drywall, flooring, and even the foundation of your house.
While hiring a professional plumber is always an option, especially for complex systems, many common household leaks can be diagnosed and repaired effectively by the homeowner. Undertaking do-it-yourself (DIY) leak repairs offers tangible benefits beyond just fixing the immediate issue. First and foremost, there is the financial advantage. Professional service calls often come with hefty labor fees and minimum charges that can far exceed the cost of the parts needed. By taking matters into your own hands, you invest in your own knowledge and save thousands of dollars over a lifetime of homeownership. Secondly, DIY repair allows for immediate action. When a pipe bursts at night, waiting for a plumber to arrive the next morning could mean hours of water damage. With basic DIY skills and the right tools, you have the power to mitigate disaster instantly.
This comprehensive guide will walk you through everything you need to know to become comfortable with minor plumbing repairs. We will cover what tools are essential, how to spot the source of a leak, step-by-step repair techniques for the most common problems, and crucially, when it is time to call in the experts. Whether you are dealing with a squeaky faucet or a loose fitting, understanding the basics empowers you to maintain a healthy, dry, and efficient home.
## Preparation: Essential Tools and Safety Measures
Before attempting any repair, preparation is the cornerstone of success. Entering a job with insufficient tools often leads to frustration, damage to existing fixtures, or personal injury. Furthermore, working around water introduces unique safety risks that must be respected to protect both the property and yourself.
### Essential Plumbing Tools
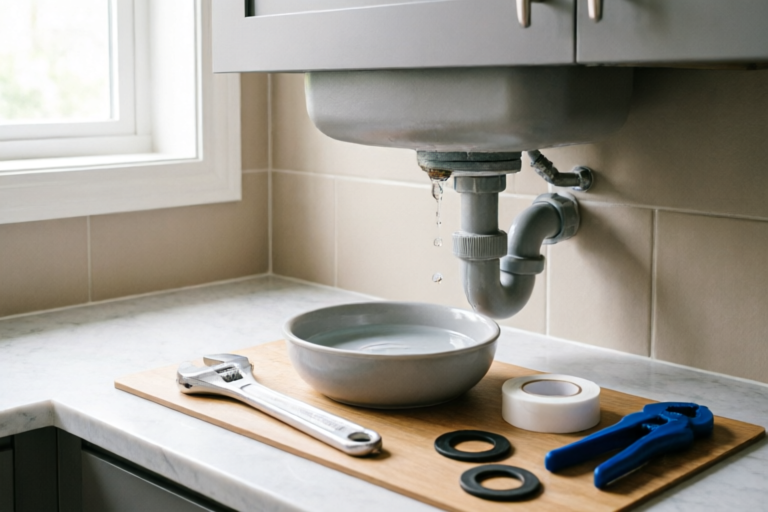
You do not need a warehouse of equipment to handle the majority of household leaks. However, having a dedicated toolkit makes the process smoother. Here is a curated list of essentials:
**Adjustable Wrenches and Basin Wrenches:** These are the workhorses of DIY plumbing. An adjustable wrench (often called a crescent wrench) is versatile and necessary for tightening or loosening various nut sizes. A basin wrench is specifically designed for tight spaces under sinks, allowing you to reach nuts holding faucet supply lines that normal wrenches cannot grip.
**Plumber’s Tape (Teflon Tape):** This thin white tape is used to seal threaded pipe joints. Without it, water will eventually seep through microscopic gaps in the threads. It is cheap and effective for stopsing drips from spouts and threaded connections.
**Pipe Clamps and Couplings:** For small cracks or breaks in pipes where glue isn’t viable (such as copper), slip joint couplings or repair clamps can provide a secure seal.
**Silicone Sealant and Caulk Gun:** Water intrusion often happens not because of broken pipes but failed seals. High-quality, mildew-resistant silicone is required for sealing around showers, bathtubs, and sinks. A caulking gun helps apply this material evenly.
**Bucket and Towels:** Always place a bucket underneath any work area to catch residual water in the pipes. Old towels or rags are essential for soaking up spills immediately, keeping the workspace dry and safe.
**Pliers:** Needle-nose pliers are useful for removing small debris or worn washers. Channel locks offer a larger gripping surface for bigger fittings.
### Critical Safety Measures
Plumbing involves a mix of water, pressure, and sharp edges. Adhering to safety protocols is non-negotiable.
**Shutting Off the Water Supply:** Never ignore this step. Before loosening any pipe or fixture, you must shut off the water. Most fixtures have individual shut-off valves located directly beneath the sink or behind the toilet. If these do not exist or are corroded, you may need to locate the main water shut-off valve for the entire house, usually found in the basement, garage, or near the water meter on the exterior wall. Turn the valve clockwise until it stops.
**Protective Gear:** Wear heavy-duty rubber gloves. Pipes and old plumbing fixtures can harbor bacteria, rust, and sharp burrs that cause cuts. Safety glasses are equally important; when draining pipes, pressurized water might spray unexpectedly. If you are working under a sink, wearing a hat or headlamp can prevent accidental bumps against hard surfaces.
**Electrical Hazards:** Be acutely aware of electrical outlets near water sources. While water itself does not conduct electricity well, water containing minerals (like tap water) does. If you are repairing a dishwasher or garbage disposal, consider turning off the circuit breaker to prevent shocks.
**Ventilation:** If you are using strong chemical cleaners, drain openers, or unclogging chemicals, ensure the area is well-ventilated. Mix these chemicals carefully according to the manufacturer’s instructions, and never mix different types of cleaners, as toxic fumes can result.
## Diagnosis: Identifying Common Leak Sources
Many homeowners attempt to repair a visible puddle, only to discover later that the real problem was elsewhere. Water travels along paths of least resistance, meaning a leak originating at the ceiling might actually stem from a roof or a pipe several rooms away. Accurate diagnosis saves time and prevents unnecessary dismantling of fixtures.
### Visual Inspection and Moisture Detection
Start your investigation by looking for the obvious signs. Discoloration on walls or ceilings, peeling paint, bubbling wallpaper, and soft spots in flooring are classic indicators. Mold typically appears as black, green, or grey fuzzy patches and often comes with a distinct musty odor.
Use a moisture meter if you have one; these devices detect humidity levels in building materials and can pinpoint damp spots that aren't yet visible to the naked eye. In the absence of a meter, a simple piece of tissue paper pressed against suspected areas can reveal hidden moisture.
### Common Problem Areas
**Faucets and Sinks:**
Fauets are perhaps the most frequent culprits. Look for drips coming from the spout or seepage around the base of the faucet. If water is pooling under the sink basin despite a tight drain, the issue is likely in the P-trap (the U-shaped pipe under the sink) or the supply line connections. Check the flexible hoses leading to the wall valves for hairline cracks or bulging.
**Toilets:**
Toilet leaks are insidious because much of the water goes underground into the floor slab, which delays discovery. The silent running toilet is a major offender here. To diagnose this, perform the dye test. Put a few drops of food coloring into the toilet tank lid and wait twenty minutes without flushing. If colored water appears in the bowl, the flapper valve is leaking and letting water bypass the flush cycle.
**Showerheads and Shower Systems:**
Leaks here can occur between the showerhead and the arm, or from the seal around the shower trim plate. Check if water is spraying out the sides of the shower arm rather than the head itself. Additionally, examine the grout and caulk lines around the tub or shower enclosure. Deteriorated sealant allows water to penetrate the subfloor, causing rot over time.
**Washing Machine Hoses:**
These flexible hoses degrade over time and are prone to bursting. Inspect them periodically for bulges, cracks, or abrasion where they contact other objects. Replace rubber hoses every five years, regardless of appearance, to prevent catastrophic flooding.
**Appliance Water Lines:**
Dishwashers and ice makers connected to water lines require inspection. Often, the connection point at the wall (behind the appliance) is the failure point. Push back the appliance slightly and feel the connections for coldness or moisture.
## Action: Simple Repair Techniques for Minor Issues
Once you have identified the source and ensured your safety, you can proceed with the repair. Below are detailed, step-by-step instructions for handling the most common household leaks.
### Fixing a Dripping Faucet
A dripping faucet is the quintessential annoyance of DIY plumbing. In compression-style faucets, the culprit is almost always a worn washer or O-ring.
1. **Turn Off the Water:** Close the shut-off valves under the sink.
2. **Open the Faucet:** Turn on the tap to release any remaining water pressure in the line.
3. **Disassemble:** Remove the decorative cap on the handle (often a small "hot" or "cold" dot) using a flat-head screwdriver. Unscrew the mounting screw and lift off the handle. You may encounter a bonnet nut securing the stem.
4. **Replace the Washer:** Loosen the packing nut to remove the stem. Underneath, you will find a plastic or brass seat holding a rubber washer. Remove the screw holding the washer in place and swap it for a new one matched exactly in size. Apply Teflon tape to the threads of the new screw if desired for extra stability.
5. **Reassemble:** Slide the stem back in, tighten the packing nut, replace the handle, and restore the water supply. Turn on the water slowly and observe. The drip should be gone.
For cartridge faucets, the process is similar, but instead of a washer, you replace the entire cartridge unit. Pull the old one out, take it to a hardware store to find an identical model, and insert the new one before closing the fixture.
### Tightening Loose Fittings and Joints
Sometimes, water doesn't need to flow to escape; it just needs a gap. Vibration from water flow can loosen pipe unions and fittings over time.
If you see water weeping from a threaded joint:
1. Drain the pipe section if possible.
2. Grip the stationary pipe side with one wrench to prevent twisting.
3. Grip the moving connector with a second wrench and tighten it clockwise gently. Avoid over-tightening, which can strip threads or crack the pipe. If the joint still leaks after tightening, you will likely need fresh plumber’s tape.
4. Unscrew the fitting completely, wrap 2-3 wraps of Teflon tape around the male threads in the direction of the thread spiral, and reconnect.
### Sealing with Silicone Sealant
Gaps around shower bases and sinks allow water to bypass drains entirely. Cleaning old caulk is key to a good seal.
1. **Remove Old Caulk:** Use a utility knife or a specialized caulk removal tool to scrape away the old, hardened sealant. Scrape until the substrate is clean and dry.
2. **Clean the Surface:** Wipe the area with rubbing alcohol to remove soap scum and grease. The surface must be bone-dry before applying new sealant.
3. **Apply Tape:** Place painter's tape along both sides of the seam where the caulk will sit. This ensures straight edges.
4. **Apply Sealant:** Cut the nozzle of the silicone tube at a 45-degree angle. Smoothly squeeze a bead of silicone along the gap. Use your finger dipped in soapy water to smooth the bead, ensuring it pushes into the void.
5. **Cure Time:** Remove the painter's tape immediately and allow the silicone to cure for at least 24 hours before exposing it to water.
### Temporary Pipe Patching
For unexpected cracks in PVC or metal pipes during winter bursts, epoxy putty can serve as a temporary fix until a full replacement is possible.
Mix the two-part epoxy putty together with gloved fingers until uniform. Press the compound firmly onto the dry, cracked area of the pipe. Shape it so it encases the crack. Let it harden according to the package instructions. While durable for short-term emergency situations, it is not a permanent solution for high-pressure systems.
## Conclusion: Prevention Strategies and Knowing Limits
Successfully fixing a leak is a triumph, but true mastery lies in prevention. Developing a routine maintenance habit reduces the likelihood of emergency repairs. Create a monthly checklist that includes inspecting visible pipes under sinks, checking toilet functionality with the dye test, and reviewing appliance hoses for wear. Replacing washing machine hoses every 5-7 years is the single most effective preventive measure against major water damage claims. Keep a flashlight and basic toolkit accessible in your laundry room or utility closet.
However, knowing your limits is equally vital. DIY repair is empowering, but it is not universal. You must recognize when a job exceeds your skill set. Call a licensed plumber if:
1. **You Hit Corroded or Frozen Pipes:** Attempting to force a frozen pipe open or unscrewing severely rusted threads often leads to breaking the pipe entirely. Specialized tools and techniques are required to safely thaw or cut and replace these sections.
2. **Gas Lines Are Involved:** If you suspect a leak near a gas line, do not attempt to fix it. Evacuate the area and call the utility company immediately. Gas leaks are life-threatening emergencies.
3. **Main Line Blockages:** Clogs or leaks in the main sewer line (where all your home's water exits) require heavy machinery like drain snakes and video cameras to diagnose and repair properly.
4. **Structural Concerns:** If the leak has caused sagging floors, mold growth behind walls, or extensive staining, you need professionals to assess the integrity of your home’s structure and remediate biological hazards like mold safely.
By approaching leaks methodically—preparing the space, identifying the root cause, performing precise repairs, and establishing maintenance habits—you maintain control over your home environment. The satisfaction of stopping a leak yourself is invaluable, and the peace of mind that comes from protecting your home from water damage is worth every effort. Remember, small actions today prevent big disasters tomorrow.